Thursday, February 13, 2014

How To: Make A Puppy Keychain

How To: Make A Puppy Keychain.


Over the last couple of weeks, I have been reviewing some wonderful craft books. Yesterday, I shared about making some cute keychains from the book Happy Stitch.  Today I am sharing a little how to for a cute puppy keychain that I designed.


To make Patches the Puppy, you will need…

- The template sheet at the bottom of this post.
- Cream felt, approx. 3” x 6” (5 ½ x 15 cm)
- Tan felt, approx. 7 ½” x 8 ½” (19 x 22cm)
- Small piece of dark brown felt
- Matching sewing thread or embroidery floss (thread)
- Stuffing
- 4” (10cm) piece of brown 5/8” (15mm) ribbon
- 1 small key ring of your choice
- Needles, pins and small sharp scissors. (Embroidery or scrapbooking scissors work great for cutting out small felt shapes.)
- Permanent markers, disappearing fabric pen or chalk to trace pattern (Optional. You can also pin pattern to felt or just hold it while you cut around it.)

1. Use template provided to cut out pieces.

Cut two head shapes from cream, four tan ears, one tan nose and eye patch and two dark brown eyes.


2. Sew one of the eyes onto the eye patch with a running stitch in matching thread.
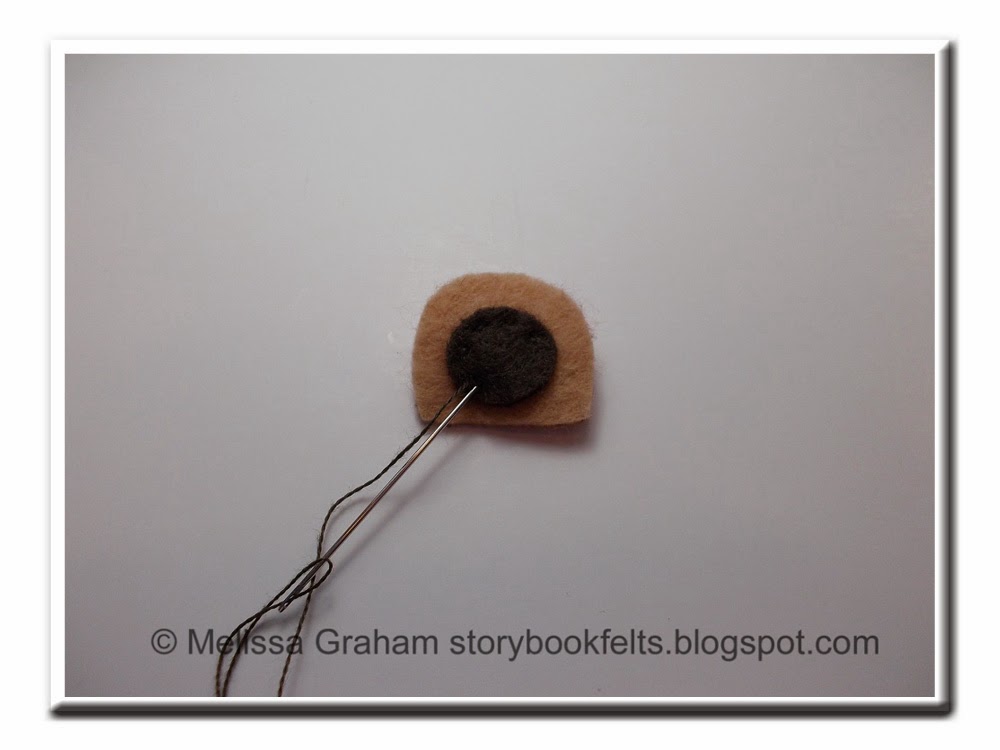

3. Sew nose, eye patch and other eye in position with a running stitch in matching thread.


4. Embroider mouth under nose with a backstitch in dark thread.


5. Sandwich two of the ear pieces together, then stitch together with a running stitch in matching thread. 

Repeat with other two ear pieces. If you need to, trim around edges to make sure they have a clean edge and match up well.


6. Loop ribbon through key ring. You can use a small piece of tape to hold the ribbon ends together if needed.


7. Sandwich the two head pieces together and place the end of the ribbon between them. Leave approx. 1” (2.5cm) of ribbon sticking out. Pin in place.


Now slip ears between the head pieces and pin in place.  

Sew ¾ of the way around, through all thicknesses, with a running stitch in color to match head. Remove pins as you go.


8. Stuff head and sew the remainder of head together.


Now add keys or attach to your favorite child’s backpack.
You can also make it in any color you want.  The one above was made to match my son's favorite snuggle buddy.

Click Here to view template in another window and print at 100%

This tutorial is for non commercial use only: you can use it to make as many felt puppies as you want for yourself or as gifts, but please don't make any for sale. You may borrow a photo or two if you want to blog about this project, but remember to credit me and link back to my original post, and do not reproduce my entire tutorial on your site. Thanks!

a1d07cbb76d8ad4df8a8a69ba8df86cc669e014195b21cbae3

Wednesday, February 12, 2014

Happy Stitch Book Review

If you have missed some of my last posts, I have been reviewing some great new craft books that I have. The one I am sharing today is Happy Stitch 30 Felt & Fabric Projects For Everyday by Jodie Rackley.


Click on the link or cover image to have a peek inside the book. If you click on Jodie's name above it will take you to her blog as well.

This book has 30 fun projects that range from curtains and lampshades to cake toppers and softies.
Here are a few things you can make from the book.

Nesting Doll, Owl and Fox Softies.

Embroidered denim skirt and fabric necklace.

Rainbow coin purse and mushroom bag.

I made two of the mini softie keychains.
I made the panda and a ladybug keychain.
There is also a lion and a leaf that you can make and turn into a pin or keychain.


I made the ladybug a little different by not stitching the wings down on the edges.  I just embroidered the dots and that was enough to hold them down.  It makes her look like she is ready to take off. They are both on my daughter's backpack now.  They were both quick, easy and fun to make. The book has loads of fun things that I want to make. The patterns in this book are not full size so you will need to enlarge them. If you would like to find out more about Jodie and the cute things she designs, stop by her blog Lova Revolutionary for more information.

My son wanted some fun keychains for his backpack too so mom was off to make a cute keychain for him as well.  He loves anything that has to do with dogs so I designed a keychain after one of his favorite stuffies.  Meet patches...
If you would like to make a Patches of your own, stop back by tomorrow and I will have a tutorial on how to make him. Plus, Patches and the other two keychains are available to purchase in my Etsy shop.


The ideas, thoughts and comments in this review are my own.  I was not compensated for this review, nor did I receive a free product for it.


Wednesday, February 5, 2014

A Heart-Felt Holidays Book Review

Back in December, Mr. Boo got a part in his 3rd grade music program.  He was a Holly Jolly Pirate of Pinataville. Being a pirate, he needed a cute little parrot to sit on his shoulder and be his side kick. Of course being the crafty mom that I am I felt the need to whip up a cute little parrot for him.  I searched the internet for cute parrots and came across this one...


Upon clicking the link I found out it was on one of my favorite craft blogs, Bugs and Fishes. I then discovered that it was a pattern the she had created for a book titled Heart-Felt Holidays by Kathy Sheldon and Amanda Carestio.  


As luck would have it, I had just found this book at my local library and had it on hand at the house.   I printed out the pattern and made my own version.


The instructions were very easy to follow and the pattern was easy to enlarge and use. The parrot in the book is flat and one sided (the other side is just solid red).  I stuffed mine and made it the same on both sides so that when he was finished with the program it could be a stuffie.  I added a pin back to one side of it so that we could pin it to his shirt (we removed the pin back when the program was over).  I made the hat but forgot to attach it so Polly didn't have his hat for the program.

Here are a couple pictures of him all dressed up in his costume...
Displaying photo 1.JPG
ARRRRGGGH
Displaying photo 2.JPG
This one is a little fuzzy but I had to get one of him with his stash on. This is right before they did the practice program for the school during the day.  He did fantastic and had quite a few speaking and acting parts as well as a solo.

Displaying photo.JPG
I got to see the program twice.  I was there for the practice program during the day, as well as the one for the families that night.  When he came out on stage for the night time performance, we had trouble finding him.  See the child in the middle with the very long black hair?  That dear friends is my son.  Let me tell you we were EXTREMELY surprised!!  When we dropped him off in the music room he had very short very red hair and suddenly we had a child with long black hair.  

He has had a blast playing with his Polly bird since the program!!  If you would like to see more of this book please click on the link above and have a peek.  I can't wait to make some more of the goodies out of it!! There are 40 projects so there is a little something for everyone.  I would love to hear what you think of the book if you have it or have a peek at it.

The ideas, thoughts and comments in this review are my own.  I was not compensated for this review, nor did I receive a free product for it.

Wednesday, January 29, 2014

A Wee Wonderfuls Book Review

While at the library last week, picking up some books for the kids to read, I found the cutest book and checked it out. Wee Wonderfuls by Hillary Lang. You can find out more about Hillary on her Wee Wonderfuls Blog.
        
(Hard cover)                                                          (Paperback)

I am always on the look out for cute felt books but they are hard to find at or local library, or the waiting list for them is half a mile long. I felt like a treasure hunter who had just dug up a buried treasure. I snatched that baby up, went and picked up the kids books and made a bee line for the house.  Once there I plopped down in my favorite chair and flipped through the little treasure. Then I pulled out the felt and made Lulu the little Mermaiden doll.

Isn't she cute.  This is the one from the book...

And here is my little Mermaiden.  Lulu loves yellow and pink and of course it had to have red hair like her. (yes she is 14 but she still loves all things cute a frilly!) The one in the book is machine stitched but I did all of mine by hand. I know I have some rickrack around here somewhere but could not for the life of me find it so the little flower will have to wait a few days.

There are loads of other cute dolls and such in the books.  This is one of my favorites.  Her name is Panda Buns.  Her little buns on the sides of her head look like pandas.

The little inchworm on the cover of the paperback edition is named Evelyn.  She is too cute and has already been ordered by Lulu also.  The book has 169 fantastic pages that include full size patterns so you don't have to worry about trying to get them enlarged to the correct size.  There is also a section at the back of the book titled Wee Wonderfuls Basics.  The section covers the basic materials and methods that the author uses for sewing toys. There is even a list of resources used. If you would like to see more of the book, feel free to click on the Amazon links above. I love all the projects in this book and I have a feeling most of you will also.

My personal copy is on its way to my house as we speak and I can't wait to get it so I can make even more goodies out of it. I also received an Amazon gift card for Christmas/My Birthday (last Tuesday #39!!) and ordered 4 other wonderful books so keep an eye out for a review on a couple of them.  If you get a peek at the book or have already seen/used it please let me know.


The ideas, thoughts and comments in this review are my own.  I was not compensated for this review, nor did I receive a free product for it.

Crafter's Blog And Shop Hop January 28, 2014

Welcome to the Crafter's Blog And Shop Hop For January 28, 2014
Hosted by
Mel's Daisy Patch
This hop will be for your Craft Blog and/or Craft Shops.


Rules

1. Grab the button above and put it on your side bar, in your linky list, or in a post so everyone knows where you link up.

2. Follow your host and co-hosts on their Blog. Please leave us a comment so we know you are new and can come visit you also.

3. Link up your Blog or Shop URL. Please DO NOT link up a specific post just the blog or shop URL. Please save the specific posts for The Monday Funday Hop.

4. Hop around and visit some of the other blogs listed.  Who knows, you might make some lifelong friends in the process. Make sure to leave them a comment so they can visit you as well.

5. If we have a sponsors listed, please visit their pages also. 

Note:  All links are being checked for spam sites and malware sites. If you click on a link and it leads somewhere it shouldn't please contact your host or co-hosts so we can delete it.
Your Host:

Your Co- Hosts:
Storybook Felts 

 Cutey Patuty CrochetMomwithahook Crochet Bloglovin


If you are interested in Co-Hosting please contact the host by using the contact page HERE. THERE IS NO FEE FOR CO-HOSTING. I will add new co-hosts weekly and the hop will run for a month.
If you would like to sponsor the hop, please contact me with the link above. Your ad will be placed just below the linkup image below for everyone to see and on the sidebar for the month. Sponsorship is $5.00 for the month and all you have to do is sit here on the post and look pretty...No blog posting required but you still get all the views. 

Link Up